
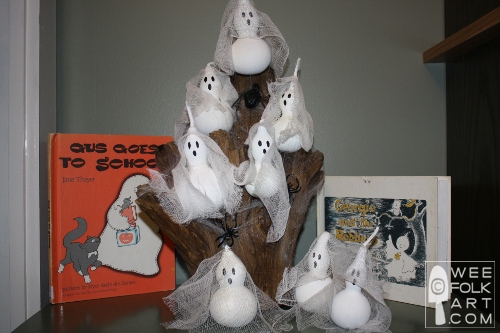
Gourd Ghost Sculpture Halloween Decoration
Saturday night is our 19th Annual Pumpkin Carving Party… I’ll tell you more about that later. But when the decorations were unpacked, a devastating discovery was made. Mice had gotten into one of the boxes and ate one of the family’s most beloved decorations… our Gourd Ghost Sculpture. I really find it hard to believe it could have been THAT tasty. I made the sculpture 25 years ago! But, alas, everyone of the little Ghosties was chewed on, leaving behind unrecognizable piles of gourd shell, and, little piles of, well, let’s just say little reminders that we had been visited by mice!

I was heartbroken. This would be the first Pumpkin Carving Party that we’d celebrate without the watchful eyes of our little friends. I knew that I really didn’t have time to remake the sculpture… what with the party 2 days away and out-of-town company coming. But, sentiment got the better of me. I told myself, if I went to our local craft stores, and could find actual dried gourds, not the Styrofoam type, I’d find time to make another sculpture. Well, at Michael’s I found some real, dried gourds. Granted, they had been painted, and true, they weren’t the shape of my old gourds, but I hadn’t qualified my personal pact, so, this afternoon, instead of the numerous other jobs I should be doing, I remade our Gourd Ghost Sculpture… and wrote up a tutorial to boot. So, if you’re still looking for more Halloween projects, and can store it away from mice in the off season, you might want to make your own sculpture.
Bonus: We have turned our Gourd Ghost Sculpture photos into a great Halloween Desktop Wallpaper.
CLICK HERE TO GET GHOST DESKTOP WALLPAPER
I began this project 25 years ago. No, that’s not true. I finished this project 25 years ago, but since then, sometime in the past year, the mice in my garage thought it would be great sport to eat my nearly petrified gourds, and I was left with a trunk with wires glued to it, and memories of my old Ghostie friends! Obviously, this project comes with a warning. If you make it… store it in a manner that mice cannot munch!
Gourd Ghost Sculpture Materials:
- 1 awesome and gnarly looking piece of wood
- coat hangers or thick wire
- wire clippers
- hot glue gun
- small gourds, dried (NOTE: you can use artificial gourds, too)
- white paint
- black paint
- spray sealer (optional)
- drill with drill bit the diameter of your wire
- spiders, spider web and cheese cloth
Gourd Ghost Sculpture Directions:
1] Find a cool piece of wood and cut it to size. (Make sure the bottom cut is level. The piece of wood should be able to stand up without tipping over.) Mine is about 18″ high by 12″ wide. Downed trees in the woods are great (that’s where I got mine), but you could also make a really neat sculpture out of driftwood.

2] Cut up wire to different lengths. The wire needs to be long enough to fit the length of your gourds plus additional length to hold it away from the trunk. This is a “plan as you go” thing. Look at your wood. How many gourd ghosts will it hold? Where do you want to position them? When you’ve made some of those decisions, drill holes into the wood about 1″ deep and at a 45 – 70 degree angle… whatever seems right for your gourd ghosts. Slip the wire into the trunk and hot glue in place. (I laugh every time I look at my trunk. This was the first time I used a glue gun, some 25 years ago. A little over kill!)

3] Paint your dried gourds with 2 coats of white paint. (NOTE: In a pinch, you can use fresh gourds, but you will need to poke holes in them to mount them to your sculpture. THEY WILL rot. So you will not be able to save the sculpture.)


4] Using black paint, add eyes and a mouth to your gourd ghosts. If you would like to give them extra protection, you can spray them with an acrylic sealer.


5] When the gourd ghosts have dried, drill a hole in the bottom of the gourd. Use a drill bit the size of the wire. (NOTE: I do not often recommend brands of anything, but I have to sing the praises of my Fiskars Hand Drill. It is definitely up there with my “must have” tools in the craft room. Easy to use, sturdy, and hand powered. It’s small and easy to use on small projects. I LOVE IT!!!)


6] Slide the gourds on the wires. If a wire is too long, simply cut off the extra length.

7] Add spider webs, spiders and squares of cheese cloth to give a spooky feeling!


3 Comments
Cassie Jean
Love it! I only discovered your blog this year and so I didn’t see this then. I’ve scrolled through your gallery but there are so many things to look at I just hadn’t gotten around to checking this out yet. I have some dried ghords AND a gnarly part of a trunk from an apple tree we had to cut down. Heading out to pick up some white paint NOW. Thanks guys. I adore your blog. BTW, going to grab the wallpaper too. You guys rock!
Erinn
We are working on this project right now :)))) We didnt really have a gnarly stump so we just ended up using a regular tree stump but it looks really good. Such a great idea! Just waiting on my gourds in the mail (as I missed the season to buy them here in my city). I always seem to b behind when finding seasonal items, LOL!
Thanks so much for the idea. Wish we could post a pic of our project once its done 🙂
Kimara
Erin~There are many ways you can post a picture if you have use of a digital camera. For starters, you can email a copy of your project to weefolkart@yahoo.com, or you can link to photos on your blog if you have one, or you can attach a photo at Wee Folk Arts Facebook page. You can also add photos to our Flickr Group http://www.flickr.com/groups/835139@N20/pool/ So, see, there are lots of ways to share your projects. We LOVE seeing how others complete our projects. Hope to see your Gourd Ghost Sculpture soon!