
Progress on the Funky Chair :)

I knew if I put the chair up on Wee Folk Art it would motivate me to get things done! Went out the same day and got some sweet fabric…

We started by taking the old seat off.


We then (btw… the “we” here refers to Tim and I, although mostly I took pics 🙂 filled a few holes with wood putty, cleaned and sanded the chair, then primed the chair with an oil based primer. It will be ready to paint in 24 hours. (Remember last post when I wondered about the numbers 1 and 4 covered in the posts… well, the word DEATH was also carved into the chair. I was all “yikes” and got the heeby jeebies!!! I decided this must have been the homework chair for an uncooperative teen 🙂


Then, we removed the old cover and foam pad … ew… they were disgusting! We used the old seat cover as a template for our new fabric.


Using the wood base as a template, we cut the foam to size.


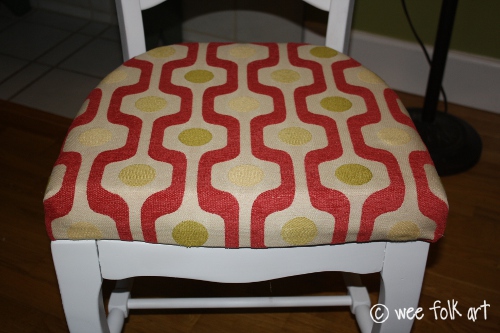
Then we covered the seat, stapling it on back with 3/8″ staples. Finally, I cut out a piece of lightweight interfacing a half inch smaller than the seat base. This was stapled to the back side of the seat to “neaten” it up.


My plan had been to share a step-by-step “how to”. After covering the seat, we decided we were no experts, and we would leave instructions on how-to cover a seat to the pros. We probably should have read up on it BEFORE we started, but like most things I do, I didn’t. Often, people have asked us why we don’t have videos online. There are several reasons… especially audio videos. One of them being, while working on this… especially the corners… my language was a tad bit colorful <shameful blush> Not something I wish to record 🙂
In retrospect, for a first time reupholstery project, we both agreed that I made things much more difficult with my fabric selection. It had a large, striped print that was not forgiving. It took forever trying to get it centered on the wooden seat. AND it was soooooo thick! What to do with all that fabric, especially the corners? We played with it until we came up with neat looking finish… certainly NOT a professional job, but I will do some reading before my next project and we WILL get better 🙂
My sister-in-law, Julie, did upholstery for years. She will be at our house for our annual pumpkin carving party, and I’m looking forward to getting some expert advice.
So, here is the finished seat, sitting on the primed chair. Next, painting. I am really looking forward to that part of the project. I’ll hopefully be able to get to it this week.
BTW… does anyone have a favorite site for make-overs or tutorials? Always nice to hear where other people go for help! The other day one of our readers (thank you Karen 🙂 shared this SITE. Lots of inspirational stuff going on there!
AND, another BTW… despite my whininess, I’m loving working on this project. A little challenge never killed anyone, right? (Tim might argue that 😉

One Comment
Candice
LOVE LOVE LOVE your fabric choice. And it looks pretty perfect to me! Can’t wait to see how you paint it!