
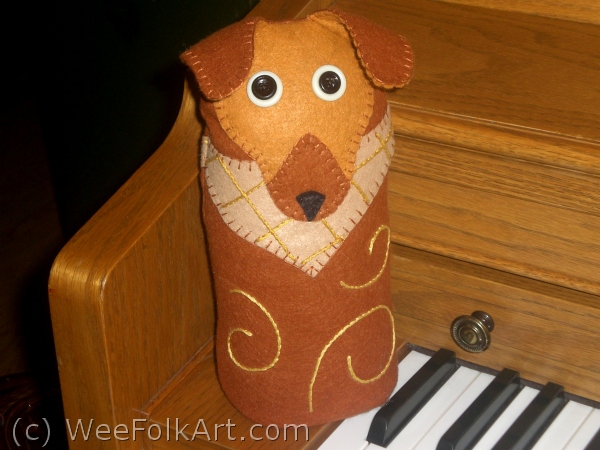
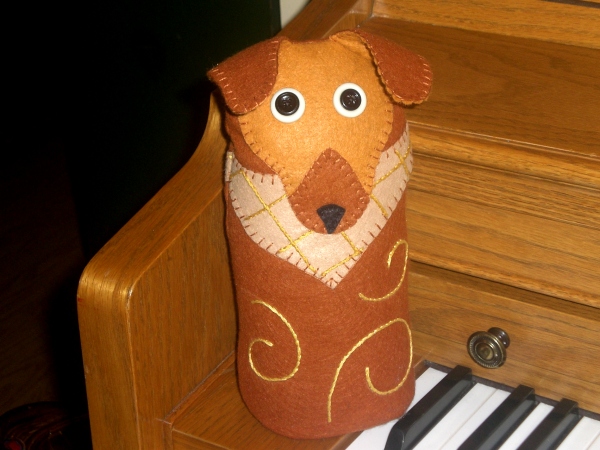
Puppy Dog Doorstop Directions

Materials: (yardages are approximate and based on optimal placement)
12″ x 18″ felt color A (Copper Kettle)
8″ x 10″ felt color B (Pumpkin Spice)
8″ x 8″ felt color C (Beige)
Scrap felt color D (Black)
Embroidery floss color A (Copper) (DMC 301)
Embroidery floss color D (Black) (DMC 310)
Embroidery floss color E (Gold) (DMC 783)
2 3/4″ buttons with 4 holes for eyes
2 1/2″ buttons with 4 holes for irises
Stuffing (wool or polyfil)
Beans, fish gravel or large grained sand for weighting the bottom
Pattern

2] Cut out pattern pieces as follows:
Color A (Copper Kettle)
2 body pieces (front and back)
1 snout
2 ear pieces
2 body pieces (front and back)
1 snout
2 ear pieces
Color B (Pumpkin Spice)
1 face
2 ear pieces
1 tail
Color C (Beige)
1 bandana front
1 bandana back
Color D (Black)
1 nose
1 face
2 ear pieces
1 tail
Color C (Beige)
1 bandana front
1 bandana back
Color D (Black)
1 nose
3] Use pattern to transfer plaid markings to bandana front and back. Using 6 strands of color E (Gold), stem stitch the lines of the plaid. Stop lines an 1/8″ before the edge.

4] Using the pattern as a guide, pin bandana front and back in place. (Make sure the bandana front and back match at the sides. When the front and back are sewn together, you want the bandana pieces to match.) Using 3 strands of color A (copper), blanket stitch bandana front to the right side of body front and bandana back to the right side of body back.

5] Using the pattern as a guide, pin snout to the face. Using 3 strands of color A (copper), blanket stitch the 2 straight sides of the snout to the face.(Do not sew the bottom of the jaw.)


6] Referring to the pattern, place face on the right side of the body front. It will overlap the bandana. Pin in place. Using 3 strands of color A (copper), blanket stitch the sides and jaw of the face to the body.
7] Using the pattern as a guide, pin nose to the snout. Using 2 strands of color D (black), use a running stitch to attach the nose to the snout.
8] Using the pattern as a guide, sew on buttons. Start by sewing the 3/4″ buttons in place using 2 strands of color D (black). Then, matching holes, and with 2 strands of color D (black), sew the 1/2″ buttons over the 3/4″ buttons.
9] Transfer the 3 swirls to the dogs’s front. Using 6 strands of color E (gold), stem stitch the swirl design.
10] Using 3 strands of color A (copper), blanket stitch one color A ear to one color B ear. Do the same for other ear.

11] Using the pattern as a guide, position the ears with color B (pumpkin) against the dog’s face. The ears should line up with the top of the head and will cover the eyes. Pin or baste in place.

12] Using the pattern as a guide, position the tail to the dog’s back. Pin in place. Using 3 strands of color A (copper), blanket stitch the tail to the dog’s back. DO NOT stitch the bottom edge of the tail to the back.

13] With right sides together, stitch front to back leaving a 2 1/2” opening as indicated on the pattern. (This opening will be used to turn dog right side out after the bottom has been added.) Make sure to reinforce the edges of the opening so it does not unravel during the turning process. (This step can be done be by hand or with a sewing machine. If sewing by hand make sure to use very small stitches.)

14] With right sides together, pin bottom in place matching side seams and notches. Sew in place.

15] Turn dog right side out.

16] Using beans, gravel or sand, fill the bottom of the dog to the opening.

17] Tightly fill the remainder of the dog with wool or polyfil. Pack tightly without stressing seams.

18] Using a blind stitch and 2 strands of color A (copper), sew up opening.

19] Give your puppy a name, take a pic and put it on Wee Folk Art’s flickr group! Meet Horace!

Note about patterns: We are sharing patterns we have designed and made for our own children, families and friends. Every effort is made to share information in a clear and accurate manner. We offer preemptive apologies for any mistakes that may be made. Please let us know via comments or emails if you stumble upon a mistake or if you encounter directions that leave your scratching your head! We will rectify the situation as soon as humanly possible!
Copyright © Wee Folk Art 2008-2009. All rights reserved. All photos, text and patterns are copyright protected. You may not copy, reproduce or redistribute any material found on WeeFolkArt.com without written permission. KM Projects retains all rights. All projects, patterns and directions are meant for your personal use and neither the patterns nor completed projects may be used for personal gain.
4 Comments
baglady
Love your site, so many lovely ideas and so good of you to share.
I want to try this pattern but with different fabrics and using a house brick as a weight. Piccies when I have done!
Also added your site to my list of links.
Keep up the good work 🙂
Michu00E8le
Annelle
Hi there,
I would love to make the puppy dog doorstop, but I cannot download the patternfrom the internet. It says the file is damaged. Can you please place the file on the internet again as I would love to make this door stop.
Thank you and kind regards,
Annelle
Kimara
We checked out the pattern and we cannot find a problem. We were able to open the pattern and print. We had a friend check on her computer, too, and she could. Please try again. You may want to try clearing your cache and rebooting your system. System links can just get a bit wonky from time to time. If you are still having problems, let us know.
chantou
J’aimerais les tutos de votre chien et de votre chat
merci beaucoup
chantou