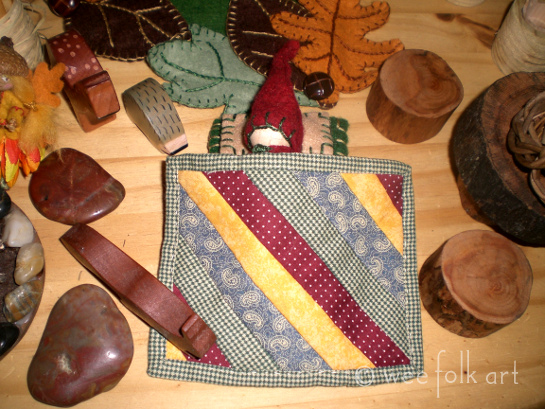
Gnome Home Diagonal Doll Quilt Pattern
Britta is airing out her Diagonal Quilt for her gnome home. Use our Diagonal Doll Quilt Pattern to make your own quilt to keep your gnomes cozy this fall.

Fall has come to the Thicket, and just like the woodland animals, the gnomes are getting ready for the coming cold months. Although gnomes tolerate the cold quite well, after a busy day outdoors, they still like to settle in with a pint of warm cider, a chair by a toasty fire, and a cozy quilt to snuggle under on especially chilly nights.
Britta has been busy getting her house ready for the cool fall nights. She spent the day getting her quilts out of storage. Several needed a bit of mending as it seems some naughty mice had been nibbling on corners, but most just needed a good airing. Nothing is lovelier than snuggling under a toasty quilt that smells of autumn sunshine! Britta has plans for a new quilt she wants to make. Now, just to find time!
Diagonal Doll Quilt Pattern
Now that summer is gone and autumn has entered the Thicket, evenings can get quite chilly. Gnomes are very resourceful and waste nothing. Scraps of material left over from other projects get squirreled away to make quilts. Although this Diagonal Doll Quilt Pattern can be sewn on a sewing machine, I highly suggest that you hand piece the doll quilt together, just like the gnome females do! What better gift could you give your gnome friends than a snuggly quilt to curl up with on chilly evenings?
Diagonal Doll Quilt Pattern Supplies:
- 4” x 5” small print cotton for backing
- 4” x 5” piece of flannel for batting
scraps of small print cotton fabric - 1″ x 24″ cotton print for binding
- Beige or gray thread for sewing
- Sewing needle
- Scissors or Rotary Cutter
Diagonal Doll Quilt Pattern Directions:
- Cut out the backing and the batting.
- From 4 different fabrics cut out strips of fabric 1 inch wide by approximately 24 inches long. If you’re using scraps you can cut several pieces 1 inch by 8 inches. You will also need one piece of fabric 1 inch wide by 24 inches long for the binding. If you do not have a 24 inch piece of fabric you can splice together 2 pieces using a ¼ inch seam allowance.

- Lay the batting over the wrong side of the backing. Pin in place. You will be placing fabric strips directly on the batting. Make sure the right side of the backing is showing.
- Beginning at a corner, lay a strip of material on top of the batting at a 45 degree angle to the quilt. (Placement of strip. You want to make sure the strip overhangs the edges of the quilt.) Leaving a little overhang, cut off the rest of the strip.

- Take a second strip and lay it over the first strip with right sides together. (Placement of strip. Make sure you overhang the strip by 1 ½ inches. After you sew the 2 pieces together you will be flipping the second piece up and the closer you are to the middle of the quilt, the larger the strip must be.
- With the 2 strips in place, pin them through the batting and the batting. Mark a ¼ inch seam allowance across the top of the second strip.

- Using a close running stitch, sew through all layers of the quilt. Tie off the end.

- Now flip the second strip up and onto the batting. Finger press the strip up.

- Continue adding strips in the same fashion until the entire quilt is covered.

- Turn the quilt over and carefully trim the strips so they are the same size as the batting and backing.


- Create a binding by ironing the 1 inch by 24 inch strip of material lengthwise with wrong sides together. Make sure you have a well defined crease. Now turn both outer edges to crease line and iron. You now have a double fold binding.
- Starting in the middle of a 5” long side, use a small running stitch to sew the binding to the quilt. You will want to go through the front of the binding, the quilt, and the back of the binding. Check the back of your work frequently to make sure your stitches are catching the back binding.


- Miter the corners and end by overlapping the beginning by ½” and turning the raw edge under a ¼” for a finished edge.