
Christmas Corner – Wooden Pine Forest

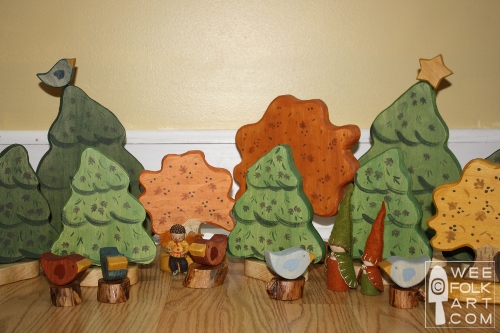
 Here is our second variation of our Christmas Tree Applique Block. Because art is suppose to imitate life… we’ve mixed our Wooden Pine Forest in with our Wooden Autumn Forest! (We will have a winter scene closer to Christmas with snow and decorations!) But for now, it is still autumn in the Thicket!
As far as the pattern goes, when you start with a simple design, there are so many different things you can do with it! I used the outside shape of our Christmas Tree Applique Block for our small trees, and I enlarged the pattern for the larger trees. Both sizes are included on our pattern, 
Here are a couple of notes that pertain to the Wooden Pine Forest. When laying out the patterns on your wood, fit the birds and stars around the trees. Trying to cut the little pieces out of little pieces of wood is both difficult and more dangerous. So, trace them near your trees, and cut out the small pieces first. That way you have a larger piece of wood to hold on to.
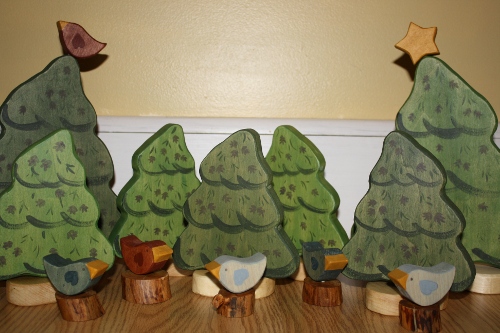
Next, we drilled holes in the tops of the two large pine trees so pegs could be fitted into them. This is an optional step but we wanted to be able to add stars for Christmas and birds for the remainder of of the year. This means your birds will have permanent pegs in them. So, we cut rings of a tree branch, then drilled a hole in the middle to hold the birds. Perfect!

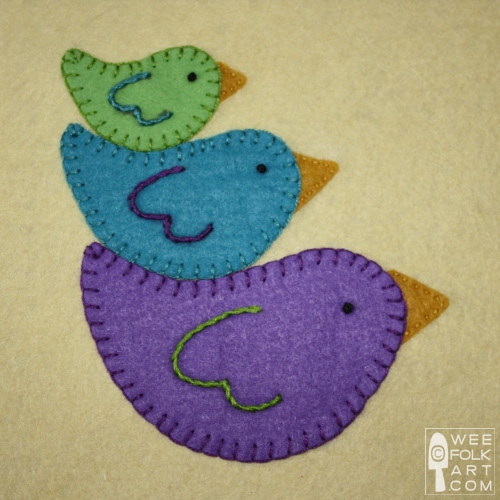
Finally, as always I used milk paint. There is information about it found in the general directions found with the Wooden Apple Orchard. To create the tiers of the trees, I darkened my green paint with a little black and made free form “swishes”. They do not need to be perfect. They simply need to imply shape. The bird’s bodies have 1 coat of milk paint. I let the paint dry, lightly drew on the wings, then painted the wings with a second coat of the same paint. The second coat caused the wings to get that dark.

If you are interested in crafting your own Wooden Pine Forest, the pattern for the trees, birds and stars can be found HERE. General directions for working with wood can be found in the Wooden Apple Orchard directions. Enjoy!

7 Comments
nightshade
Great trees but I *love* the cutsie little birdies. I want hundreds of them around the house. Little stumps are perfect. Clever, clever.
Hillary
I’m so excited I just had to tell you. I just got off the phone with my dad. I had him log on to your site and I said, “Well dad, what do you think?” And he is making the trees and birds and the autumn trees for my girls for Christmas!!!!!! I’m going to make some gnomes. My girls are 2 and 4 and I know they are going to love these. Thank you so much for the patterns and all your inspiration. Your talents and kindness are so appreciated. What a Merry Christmas this will be.
Michelle
How fun that Grandpa gets to help ‘Santa’. Good luck with everything and be sure to share photos! 🙂
Morning Glory
Too cute for words. The birds steal the show.
Christy
Oh my gosh, so totally cute!!! the little tree toppers are too adorable for words! very beautiful project!
Guest
Hi Kimara,
Let me begin by saying that I love your crafts and tutorials! I decided to make my daughters’ Christmas gifts myself this year and just purchased a scroll saw. I would like to make the winter/Christmas scene that you mention above but I cannot find it. Is it on this site?
I also started the homeschooling curriculum and my daughter loves it!
Oh and one more thing. I collected three trunk sections and would love to make a fairy/gnome village for my older daughter. I have one larger and several smaller tree trunk pieces. Do you have any suggestions how to do this and what tools to use?
Thank you so much for sharing! You put together a truly enriching and inspiring website!
Nadine
Kimara
Sometimes we just don't get around to doing everything we plan to. I never put together a winter scene in this same manner, but the Felt Tree Forest has a small winter scene. Have fun putting your own scene together. If you go to our FREE PATTERNS button at the top of the page, you will be taken to the gallery. Scroll through the gnomes and toys. You will come up with lots of winter ideas I'm sure.
As for the tree trunks… without knowing the sizes or exactly what you'd like to accomplish, it's a little bit hard to give much advice. If the pieces are big enough, you can make a 2 or 3 story gnome home by simply creating a column in the middle with a smaller trunk by boring holes in the slabs and column, then gluing in dowel rods. If they are smaller trunks, you can treat them like blocks, and cut them in heights to represent 1 or 2 story houses. You can cut the tops on angles to look like a roof, and even add shingles or thatching.
The big thing to remember when making toys for children… not only is it okay, in my opinion it is even desirable, to have their playthings merely resemble real life, not duplicate it. Their imaginations do a wonderful job of filling in the detail 🙂
BTW… glad you are enjoying the curriculum.