
Part 2 :: How To Use Your Star Braiding Loom

In Part 1 :: How to Make a Wooden Star Braiding Loom we shared a tutorial for cutting out and finishing the star braiding loom. Of course, you do not need to make one out of wood, you can make one out of cardboard and the results will be the same. But it you use one of these braiders frequently, it is wonderful to have one out made out of wood that you can use over and over again. You can find the directions for making the wooden star braiding loom HERE.
So now that you have your loom, how do you use it? Below are directions for how to create a 7 thread braid. First, however, you must indulge me. I actually made these looms 5 1/2 years ago for Pixie’s 4th birthday. I forgot all about the photos and the tutorial I had promised to share. When I was reminded about project, I went back through old files and found the pictures for the tutorials, plus the most adorable photos of the wee ones from over 5 years ago. They were just too cute not to share. The first is the birthday girl, Pixie, at 4 years old. Then we have our silly wee Bug at 7 and finally Fairy at 6 being goofy! Hey wee ones!


When they first learned to use the star braiding loom EVERYONE got friendship bracelets, necklaces and anklets. Over time we have all found other uses for the braided cords which we’ll share at the end of this post, but using them as friendship bracelets is probably still our very favorite use for them!
Materials:
- loom – wooden star weaving loom (directions to make your own can be found HERE) or a cardboard loom*
- string or yarn – I often used 100% cotton yarn but any yarn, string or embroidery floss may be used. NOTE: if you wish to use really thick yarns you may need to make wider slots and enlarge the center hole
* If you do not have a wooden loom you can cut a circle out of cardboard. Poke a hole in the center for the braid to come out and cut 8 slots on the edge of the circle equal distance apart. Proceed in the same manner.
NOTE: When cutting yarn for a project, note that you usually loose about 1/3 of the length of the yarn in the weaving process depending on the thickness of the yarn. For example… if you cut the yarn 30″ long your finished braided cord will be about 20″. Always cut a bit more than you think you’ll need. Better to have too much than to run out.
Directions: How to use your star braiding loom.
Cut 7 lengths of yarn. Bring the ends together.

Tie them together.

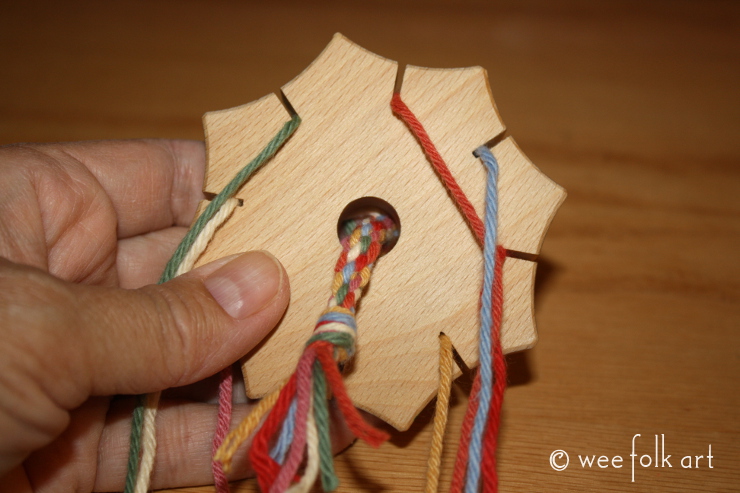
Slip the yarns through the hole. The knot should be in the hole.

The backside of the loom will have the short tails of the yarn sticking through the hole.

Place one strand of yarn in 7 slots. One slot should be empty. Although the photos were taken on a desk, you should hold the loom in your off hand with the empty slot facing you.
Count 3 slots to the left of the empty slot. Remove the yarn from that slot and bring forward to the open slot.

Place this piece of yarn in the empty slot.


Turn the loom so the new empty slot is now facing you.

Again, count 3 slots to the left of the empty slot and place this piece of yarn in the empty slot facing you.

That’s all there is to it. Just remember to count the same number of slots away from the open slot every single time you turn the empty slot to face you. Every few yarn placements of the yarn you will want to give a little tug to the braid coming through the bottom to move it out of the way.

If you are working with long pieces of yarn, you will find the long unbraided pieces of yarn will start getting tangled. Every few yarn placements run your fingers through the long pieces of yarn to untangle them.

When the braid has reached a desired length take the yarns off the loom and tie off the braid like you did when you were first tying the pieces of yarn together.

FYI: Try making a cord grabbing the yarn 2 slots down from the open slot or even 4 slots down. Each has its own look. Just make sure you do it the same for the entire braided cord or you can develop “holes” in the cord.
What if you want to make really long braided cords to use with other projects?
If the yarns you are working with are too long you will have a tangled mess you won’t be able to control. You can wrap lengths of yarn around cardboard pieces and let out a little at a time, although when I tried this my cardboard spools were constantly getting tangled, too! So, what I do is cut my initial yarns at different lengths so I run out of the yarn at different times. As one piece of yarn runs out, I tie on more yarn to that piece. The tails from the tie get woven inside the braid. I cut the initial yarns at different lengths because I do not want them to run out at the same time. This would create a huge bulge in the braided cord. By spreading out when each individual piece of yarn runs out, you spread out where the knots are in the cord and they are virtually invisible.

What to do with the braided cords?
Below are some ideas for using the braided cords but I do believe the best thing about the star braiding loom is the ability for children that are quite young to experience the joy of working with fibers. I see this craft mainly as a learning experience much more concerned about the process than the product, but there are many things you can do with the braided cords.
Basically, you have just created a small rope or cord. The size or diameter of the braid will depend on the size of the thread you were using. We have made these using a wide array of threads and yarns. We have used embroidery floss to chunky yarn. We have used jute and twine. Experiment.
Jewelry: You can make chokers, bracelets and anklet bracelets. For those we like to use the 100% cotton because they do not irritate our skin. You can find thicker cotton yarns or use embroidery floss for thin bracelets. Do a google search on “kumihimo” for tons of inspiration!
Shoelaces: These work great to make colorful shoe laces. Again, we like to the 100% cotton for the shoe laces.
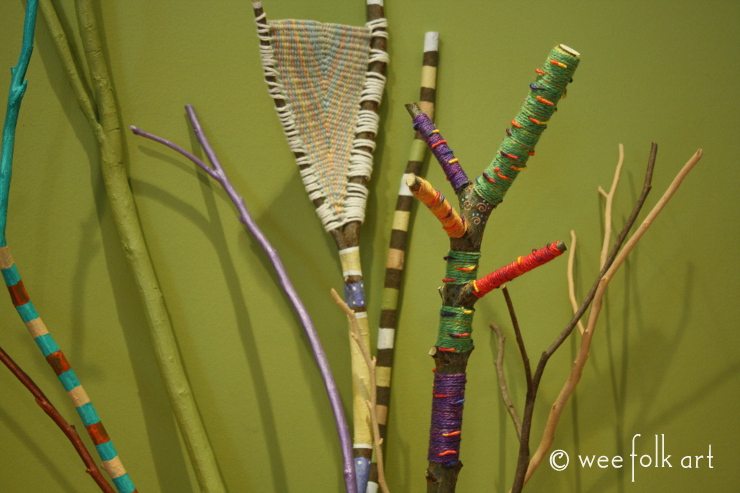
Icords: If you use yarn, you can use these like you would any icord strand. They can be braided together to make wider braids to be used as belts or bracelets. They can be wound in circles to make coasters, hot pads, seat covers and awesome rugs in gnome, fairy and doll houses. If you use chunky yarns, they can be coiled and sewn together to make hats and or an afghan.
Woven: When you are done with your braids, try using them to weave place mats.
Macrame: You can use the braided cords with macrame patterns.
Use your imagination! I’ve been meaning to try knitting with the braided cords. I think the effect would be awesome, although it would take a LONG time to make enough cording!
Try doing a google search on uses for icords or macrame patterns.


4 Comments
Pingback:
Lindsey Dixon
If you wanted to make a bigger project like a rug with the cords, would you continue to tie into your original cord while in the braider or is there a good way to join the cords after they come out of the braider if you made several separate ones?
Thank you for sharing this! I can’t wait to make a star braider and try it out.
Marsha Ivany
Hello, I LOVE these looms. I teach grades 2/3 and would like to have the kids do a project using these looms. Do you know a supplier? Thanks so much. Marsha……..ivvanym49@gmail.com
Pingback: