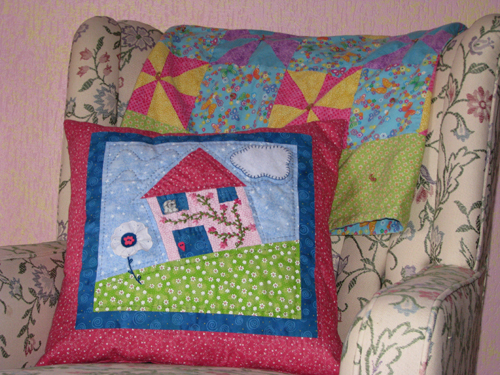
The Vine Crooked House Block Directions

Please Note: Throughout this project you will find many hints. They will help you complete the project.
Important: The pattern pieces DO NOT have a seam allowance included. You MUST add a 1/4” seam allowance BEFORE you cut out the pattern pieces.
Materials:
Fabric scraps – 5 colors, light to medium weight cotton or cotton blends
Felt scraps – white and second color (Note: If you plan to wash this project do not use wool felt as it will shrink and the color may bleed. Chose instead a high quality synthetic felt.)
Embroidery floss for quilting
Buttons – 1 for the doorknob, 1for the flower center, and 1 cat button for the window.
Eyelet Lace – for the flower head
Thread – for sewing machine or hand sewing
Pattern
(You will need a thin batting and backing but the size will depend on how you plan to finish the block. Wee Folk Art will include patterns for a pillow, a tote bag and a banner. Fabric and batting requirements necessary to complete those projects will be included in those patterns.)
Note: Because there are many little pieces in this pattern, exact measurements are necessary.
Directions:
Preparing the pattern:
1] Make copies of the pattern pieces. (Hint: It is helpful to print the pattern on card stock since these will be used as templates and the heavier weight will make it easier to trace.
2] Cut out the pattern pieces, your templates, carefully. You will use these to trace the pattern on your fabric.
Cutting out your fabric:
3] Turn your fabric so the wrong side is showing. Place templates right side down on the fabric for tracing. (You should be looking at the back of the fabric and the back of a template.)
4] Trace your template on the back of the fabric. Make sure you mark the fabric using a pencil or marker that is colorfast or especially designed to “disappear” over time, and does not show through to the front of the fabric. Make sure the template does not move. You want your trace to be accurate.
5] After you are done tracing a piece you MUST add a seam allowance. Traditionally, quilters use a 1/4" seam allowance. (Hint: Special tools are designed to make this easier. I use a Quilt Seam Guide which is a 12” long acrylic 1/4" square rod which you can lay along a seam and mark a perfect 1/4" seam. A must have for quilters!) Mark a 1/4" seam allowance on all edges. This will be used as your cutting line, and the template marks will be used as your stitching lines.


6] Cut out the pieces as follows:
Color A (sky) – 1, 3, 4, 10
Color B (house) – 5, 7, 9, 11, 12, 14
Color C (grass) – 15
Color D (roof) – 2
Color E (windows and door) – 6, 8, 13
White felt (cloud) – 16
Felt (flower center) – 17
Eyelet Lace – 8"
7] Following the Basic Layout in your pattern, layout the pieces.

Piecing the block – Refer to Basic Layout on Pattern
(Hint: When sewing the pieces together it is imperative to maintain accurate seams. I found this trick to work for me: (Refer to illustrations on your pattern.)
Step 1: Place right sides together. Begin at an outside corner. Stick a pin through the front fabric corner (illustration 1a) then make sure it goes exactly through the corner of the back fabric (illustration 1b).
Step 2: Do the same for the other corner. (illustration 2)
Step 3: When placing the rest of the pins, go through the seam line on the front fabric making sure it goes through the line on the back fabric. If necessary, gently ease the fabric to fit between the 2 corners. (illustration 3)
Step 4: When you sew the seam, start at the edge of the fabric, not the corner, and sew off the outer edge. (illustration 4)
This should help ensure accuracy throughout the piecing.)
Row 1:
8] With right sides together sew piece 1 to piece 2. (Note: There are circles with numbers in them on each template which indicates which pattern piece, or pieces, that seam is meant to attach to. (Note: the placement of the numbers does not necessarily line up with the actual pattern pieces. It’s just used to denote which pieces should be touching.)

9] Iron seam. (Note: When quilting, seams should not be ironed opened but rather ironed to one side together. This helps make the piece stronger.)

10] Attach to piece 3 and iron seam.

Row 2:
11] Sew pieces together as follows:
House Row 1:
5 to 6, 6 to 7, 7 to 8, 8 to 9. Press seams
House Row 2:
Piece 11 does not attach to anything at this point
House Row 3:
12 to 13, 13 to 14. Press seams

12] Sew House Row 1 to House Row 2, then House Row 2 to House Row 3. Press seams.
13] Sew pieces 4 and 10 to house. Press seams.

Row 3:
14] Row 3 is a single piece.
15] Sew Row 1 to Row 2 and Row 2 to Row 3. Press seams.
16] Your block is now pieced. It should measure 12 1/2" x 12 1/2".

Embellishments
Vine:
17] Using the pattern as a guide transfer the vine to the house. Embroider as follows:
Stem – stem stitch using 6 strands floss
Leaf – disconnected stem stitch using 6 strands floss
Flowers – lazy daisy stitch using 6 strands floss
Buds – French stitch using 6 strands floss

Flower:
18] Turn under both edges of eyelet lace 1/2" and iron.

19] Using a small running stitch close to the unfinished edge, sew across the top.

20] Pull thread tightly to gather lace. Tie off so the lace stays tightly gathered. Do not cut the thread. Using a blind stitch sew the 2 edges of the lace together to make a circle.


21] Using the pattern as a guide, stem stitch the stem using 6 strands of floss and add leaves using a detached chain stitch.

22] Using the pattern as a guide, place eyelet flower on stem with right side up. Place the round flower center on the flower, and position a button in the middle. Securely sew the button on going through the round flower center and the eyelet flower.

Cloud:
23] Using the pattern piece #3 as a guide, position the cloud in the sky and pin in place. Blanket stitch the cloud to the sky using 6 strands of floss.

Buttons:
The button on the door and the cat button will be sewn on after you have quilted your piece. Refer to pattern for placement.
Quilting the Block:
Decide on how you wish to finish your block. Wee Folk Art will have instructions for setting the Crooked House blocks in a pillow, a tote bag and a banner. You may decide to finish it in a different way. But the quilting of the block will remain the same. You will need your finished block, a thin batting (I use an organic cotton batting) and a backing. Exact sizes will vary depending on how you finish the block.
I have included an illustration of how I quilted my block, but the choice is yours. Because the block is “busy”, I wanted my quilting to be subtle. To quilt I used 3 strands of floss in colors that matched my material. This gave the block dimension without creating extra detail. But have fun with your choices and make it uniquely your own!
CAUTION: If you are making this for a child under 3 years old, do not use buttons. They are a choke hazard. Instead, embroider or appliqué the doorknob, flower center and cat.
Note about patterns: We are sharing patterns we have designed and made for our own children, families and friends. Every effort is made to share information in a clear and accurate manner. We offer preemptive apologies for any mistakes that may be made. Please let us know via comments or emails if you stumble upon a mistake or if you encounter directions that leave your scratching your head! We will rectify the situation as soon as humanly possible!
Copyright © Wee Folk Art 2008-2009. All rights reserved. All photos, text and patterns are copyright protected. You may not copy, reproduce or redistribute any material found on WeeFolkArt.com without written permission. KM Projects retains all rights. All projects, patterns and directions are meant for your personal use and neither the patterns nor completed projects may be used for personal gain.