
Watercolor Feather Embroidery Pattern
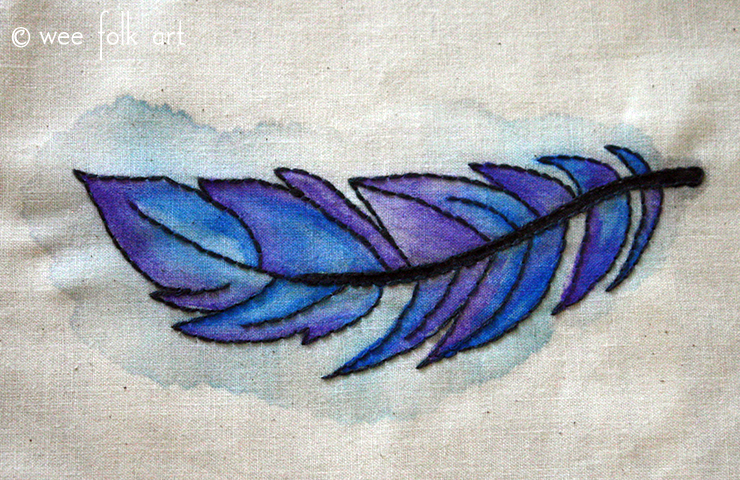
This Watercolor Feather Embroidery Pattern came to be as I was playing with combining embroidery and watercolor painting. As you may remember, in the fall I watercolored fabric prior to embroidering leaf designs. Yesterday I reversed the order and embroidered the outline of a feather first and then watercolor painted in the blank spaces. I’m happy with the results. I’m not sure what I will do with the finished feather design, but I think I will be incorporating it into a mixed media project.

Watercolor Feather Embroidery Pattern Materials
- muslin fabric
- feather pattern
- black or dark gray embroidery floss
- sewing hoop and needle
Stitching the Watercolor Feather Embroidery Pattern
I used two strands of embroidery floss and just back stitched the feather design. Even though in the pattern I filled in the stem of the feather black, I only embroidered the edges of it and painted the inside black. You could also use a fill stitch or satin stitch if you prefer.

Painting the Watercolor Feather Embroidery Pattern
Before I painted directly on my embroidered design, I played with different watercolor techniques on some scrap muslin fabric. I tried using watercolor pencils and watercolor cake paints. In the end I decided to use the watercolor paints but the pencils would work fine too.

EDITED TO ADD: I found that I did not need to pre-wet the area. There was enough water on my brush to have the paints bleed together. I did a test sample on wet fabric and one on dry and prefered the dry fabric look. Do some samples before you start to find what what you liked the best. I used both a dark blue and a purple paint and played with some shading.

I really like how some of the color bleeds out under the edge of the feather embroidery design. The overall effect is quite pretty.

2 Comments
Suzanne
You can also use Inktense pancils to paint on fabric. Once dried and ironed it becomes waterproof too.
Pingback: