
Converting Our Hedgehog Applique into a Hedgehog Embroidery

Recently, Pixie, Fairy and their friend Sprite have been learning embroidery. It reminded me of how much I enjoy needlework. Right now they are learning the back stitch and French knots using an embroidery pattern we purchased of three adorable little girls. (I'll talk more about that when they are done.) I embroidered one of the little girls, too, and after talking to my DIL Meghan, decided to turn the piece into a pillow for Little Lady.
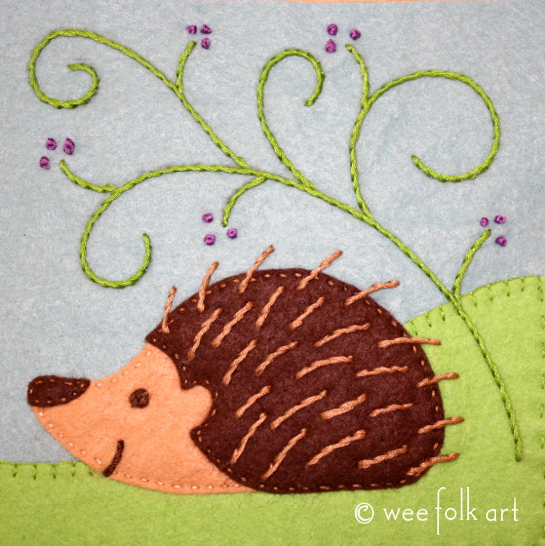
Of course, that means Little Guy needs a pillow, too. I decided to turn our Hedgehog Applique Block into an embroidery pattern. You could do the same with any of our FREE Applique Blocks. This is how I did it.
First, I made a copy of the pattern which can be found HERE. I then used my new light box to trace the pattern onto a piece of soft white cotton, using a water erasable marker. Of course, you can use any method to trace the pattern on a piece of cloth.

When I was done tracing the pattern it looked like this. You will notice the lines that indicate the ground and how the vine just stops.

Since I wanted the design to be in the middle of a pillow, and I wanted to leave space all the way around it, using the water erasable marker, I free-hand continued the vine to go around the back and under the hedgehog. Notice two things… first, I used the same type of curls I used above the hedgehog, and two, I was none too neat about it! What a mess! But I didn't worry about the mess, because the marker is erasable with water. No worries!

Now I was ready to start stitching.
Directions for how to make all the stitches used can be found in our Stitching Glossary.
I used a back stitch and 2 strands of standard DMC embroidery floss on everything accept the "berries". For the nose and eyes I began by outlining them, then I went back and filled them in with back stitches. If you would like, you could use a satin stitch. Note: Satin stitches are longer, and can easily get caught and snagged. If I was doing this as a wall hanging, I would consider using a satin stitch, but since it will be a pillow, which will be carried around, I wanted small stitches throughout the piece.
For the berries, I used 3 strands of DMC floss, and made French Knots.
I used a 7" embroidery hoop.

When I was done, the hedgehog looked like this.

Notice how I improvised on the back of the vine. Doesn't matter, all the blue lines will disappear!

Finally, I sprayed the piece using a fine mist, and like magic, all the blue markings disappeared!

Wah lah… here is our Hedgehog all done, ready to be turned into the center panel of a pillow. I love the retro 1940's feel it has to it. I'll share that as soon as I can unearth my sewing machine!

Photos 3-25-14


2 Comments
Anonymous
Your quilt applique’ blocks inspired me to make a book for our little guy’s first birthday. I enlarged the blocks to 10 inches and used different fabrics to make different blocks. I machined appliquu00E9d all the animals. I have never made my own patterns but, because of reading your blog, my daughter and I created a sea turtle page and a dragonfly page. Some of the fabrics we used were fun fur for the squirrel tale, hedgehog and spider legs, terrycloth for the bear in the water page, vinyl for the snail shell, PUL for the lizard, a felted sweater for the squirrel body, satins and velvet for the lightening bug, and lame’ for the dragonfly. I also used fleece, quilters cotton, and flannel. Thank you for the inspiration!!! My children love to look at your blog (I know it’s a safe read.) and have tried many of your patterns. We have a house full of gnomes.
Kimara
You’ve made my day! We so love to hear that our designs are being used. I especially love to hear that our blog inspires others to venture out on their own, creating their own designs. We will endeavor to offer projects that your family will enjoy. ((hugs)) ~Kimara~