
Mini Pumpkins

To create one teeny tiny pumpkin, or a whole patch, follow these simple instructions. The pumpkins can be made out of cotton calico or wool felt. The calico pumpkins will be slightly smaller. If making a whole patch, mix and match autumn colors to give a “natural” look.
Materials:
Scraps of cotton calico and wool felt
Embroidery floss
Stuffing
Pattern

1] Make 1 copy pattern.
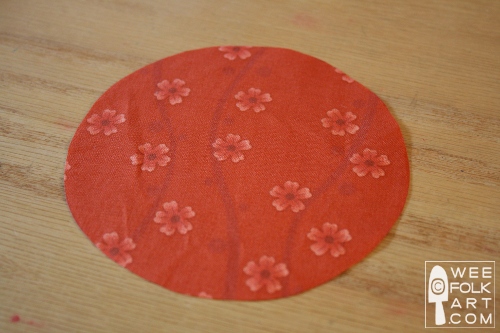
2] Cut out 1 circle for each pumpkin. You can use a cotton calico or wool felt. Cut out 2 – 3 leaves out of wool felt for each pumpkin.
If using calico:
3] Turn under 1/4″ hem to the wrong side of the fabric. Sew a running stitch around circle using 3 strands of floss. Do not cut thread.


If using felt:
3] Sew a running stitch around edge of circle. Do not cut thread.
For calico and felt:
4] Begin gathering the running stitch until you create a pouch.

5] Fill with stuffing and finish gathering the running stitch and tie off. The needle will be secured at the center top of the pumpkin.


6] With the thread still attached at the top, poke the needle through the center bottom of the pumpkin, going through the pumpkin, and bringing your needle out of the pumpkin at the center top.

7] Pull firmly on the thread creating a ridge along the thread line. While the thread is pulled taut, tie off the thread. Do not cut. You will now have a pumpkin ridge.


8] Continue in the same fashion, coming up from the center bottom and out through the center top, pulling the thread taut, and tying off at the top. Create a total of 6 evenly spaced ridges. After the final ridge is tied off, cut thread.


9] Cut out 2 or 3 leaves for each pumpkin. Using 2 strands of floss that match the leaf, tack one leaf at a time to the top of the pumpkin. If using different colored leaves, use thread that matches each leaf color. Arrange in a natural looking manner.


10] To make the stem, finger stitch or crochet a chain 1/2″ long using 6 strands of embroidery floss. Tie off the end of the chain but leave a long tail. Clip the thread at the top of the chain so only about 1/8″ remains.


11] Thread the 6 strands of floss into a needle, position the stem where you want it on top of the pumpkin, and poke the needle through the pumpkin and out through the center bottom. Make a small stitch and poke the needle back up to the top, pulling it out under one of the leaves. Tie off the thread.


Now… make a whole patch full and set them outside your gnome or doll house!

Note about patterns: We are sharing patterns we have designed and made for our own children, families and friends. Every effort is made to share information in a clear and accurate manner. We offer preemptive apologies for any mistakes that may be made. Please let us know via comments or emails if you stumble upon a mistake or if you encounter directions that leave you scratching your head! We will rectify the situation as soon as humanly possible!
https://www.weefolkart.com
Copyright © Wee Folk Art 2008 – 2009. All rights reserved.
All photos, text and patterns are copyright protected. You may not copy, reproduce or redistribute any material found on WeeFolkArt.com without written permission.


10 Comments
Amy
These little guys are so cute! I am putting them in my to-do file for next year.
Nancy
These are so cute! Thanks for the photo’s showing the step-by-step instructions. Can’t wait to make some.
Kimara
Thanks! They are also very easy to make and a great take along craft since they are small and require few materials. Have fun!
JenK
I thought these were just darling. I picked up some scraps of fall-ish fabric and made one. Then I made a giant one with the rest of the fabric when I realized I was in need of a pin cushion. It worked like a charm!
napami
beautiful! thanks for the idea
josephine4h
thanks a lot for your tutorial. Now tere are some pumpkins in france. you can see them on my blog
bises
josu00E9phine
handmaketh
We needle felted a group of pumpkins about this size and attached them all with a looong vine into a circle, for an autumnal table centrepiece. It looked really effective.
Your gorgeous little creations would also make a lovely pincushion!
http://www.facebook.com/handmaketh
Kimara
It sounds beautiful. I would love to see it, but I can't get the link to work. Can you retry?
Mary Furey
Thanks for so many Ideas, the little one at school love to play and explore the bush so I’ve made a bush house, your beautiful ideas will make it so much fun and enjoyable learning
My wonderful grown son used wooden cut offs to make me a bush house using an old cup cake stand as the pattern . Shows your never to old to play and create.would love o send you some pictures when finished . Keep up the wonderful work.
Miss Mary
Michelle
We would love to see some pictures! We are always happy when we inspire others. 🙂