
Little Gnome and Fairy Books

The orignial blog for this project can be found HERE. It contains additional photos and information.
Who doesn’t like a good book? Well, gnomes love the old traditions of sitting around a campfire and telling tales of adventure and folly. But, they also like curling up in easy chair at home, in front of a fire, and reading of places far and near. With the help of a few toy catalogues and other recycled papers, you can make a basket of books for your gnomes, and their friends the fairies, to read and enjoy.
Materials:
toy catalogues or other magazines
magazine with text and/or blank paper for writing your own stories
embroidery floss
optional: stapler
optional: very fine tip permanent marker
optional: Crazy Glue or Fray Check
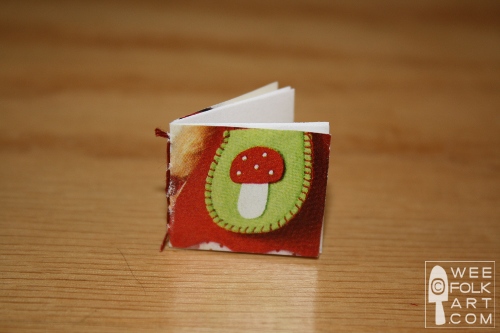
1] In a magazine find a picture you want on front of your book.
2] Cut out the cover horizontally, 1 3/4″ x 7/8″. Because the paper strip will be folded in half to make a book, make sure the desired “front cover” design is near the right edge of the strip. This way, when you fold the book in half, the picture will be on the front cover. Cut out two more strips of paper 1 3/4″ x 7/8″ for the inside of the book. You can either use text from old magazines or plain paper to leave as a journal or for writing a story in.

3] Pile the front cover over the 2 strips of text or blank paper.

4] Fold them in half, making a sharp crease on the spine.

5] If you would like to write a story, I suggest you do it now, before you sew or staple the book together. This way, if you make a mistake, you don’t waste time or your outside cover. When writing in your book, may sure you keep it in the order it was when you folded the strips in half. Use a very fine tipped permanent marker and write small. For younger children, you may want them to dictate a story and you write it in the book. Just for an example, here is a very simple story I wrote to demonstate how much text you can actually fit into one of these books:
Once there was a silly little fairy that thought she was better than all others. Her name was Vanny. Vanny never played with the other fairies. “They are not smart enough or pretty enough or fast enought”, she thought. So she was often alone. One day Vanny found the most beautiful pebble in the stream. Vanny wanted to show it to someone, but who? She had no friends. That day Vanny spent a long time thing. “What good is beauty and intelligence and speed if you no one to share it with?” The very next day Vanny went to see the other fairies. “I am so sorry”, she said. I have been silly and vain. Will you forgive me?” All the fairies hugged Vanny and called her friend. And they all agreed the pebbles was the most beautiful stone they had ever seen. The End!
I was able to use the inside of the back cover to write on, but still… that’s a lot of text you can get into a little book! Children will love “reading” the stories to the gnomes and fairies.
6] To put the book together, you can simply place one stable in the book’s spine, so the “sharp pokies” are on the inside.

7] If you would like to stitch the book together (my preference) begin by poking holes in the spine, through the 3 layers of paper. Hold the book firmly so the pages do not slip. I put 6 or 7 holes in each spine.

8] Turn the book over so the cover is facing up. Using 2 strands of embroidery floss, poke your needle through the first hole. Leave a tail that extends 2″ – 3″ beyond the bottom of the book.

9] While hold the tail against the spine, bring the needle up through the 2nd hole, coming up to the right of the tail.

10] Insert your needle back into the 2nd hole, now to the left of the tail. Your thread will be over the tail. Pull tight enough to the tail lays firmly against the spine, without pulling it to the inside of the book. The tail has now been secured to the 2nd hole.

11] Continue working your way down the spine in the same manner, always coming up through a hole, to the right side of the tail, crossing the tail, then going back into the same hole, to the left of the tail.

12] When you have finished your last hole, turn the book over so you are looking at the inside of the book. The thread will be sticking out of the last hole.

13] From right to left, slide your needle under the thread that stretches from the last hole to the one above it.

14] Work your way up sliding your needle under the threads. When you finish the last one, poke your needle through the top hole. (It will now be on the outside of the book.)


15] Turn the book over and clip this thread and the tail at the bottom even with the edge of the book. Optional: If you would like, you can put a drop of Fray Check or Super Glue on the threads to prevent them from unraveling, but I didn’t.


Now your books are ready to share with your gnomes and fairies. This same process of book binding can be used on bigger books, too!


OUR “DISCLAIMER”! We are sharing patterns we have designed and made for our own children, families and friends. Every effort is made to share information in a clear and accurate manner. But we are only human, although I often long for superhuman powers, and as humans, mistakes will be made. We offer preemptive apologies for any aforementioned mistakes. Please let us know via comments or emails if you stumble upon a mistake or if you encounter directions that leave you scratching your head! We will rectify the situation as soon as humanly possible! Before beginning any of our patterns, think of yourself as a Beta Tester. We do not have a staff, editors or even volunteers that are crafting our projects before we share them. YOU are the first to have a go at them. As such, other than a heartfelt apology, we accept no responsibility for mistakes made, or in an extreme circumstance, for time or supplies wasted. Please tackle our projects in the same manner that we are sharing them, with a spirit of goodwill and global friendship!
Copyright © Wee Folk Art 2008 – 2010. All rights reserved.
All photos, text and patterns are copyright protected. You may not copy, reproduce or redistribute any material found on WeeFolkArt.com without written permission. Wee Folk Art retains all rights.

3 Comments
KatSkarbek
Hi, I just lucked across your blog via another and I have been delighted and astonished at all the wonderful things you have created here. I am in love with your wooden trees and your tiny books and your gnomes and I just wanted to say a hearty ‘thank you’ for being willing to share all of these delights for free. What a gift to children everywhere, not to mention their adults. Thank you. Thank you. Thank you. I will be back often.
Kimara
We are delighted you "lucked across our blog" 🙂 We are always delighted to welcome new readers and appreciate the time you took to say thanks. We wish you and your children many a happy hours crafting our projects!
jane
By all the awesomeness I am finding here!! I too lucked across finding your blog. Thank you so much for sharing your skills with others like me. I have 2 young girls I want to make toys for and with your guidance I know I can! Love love love!