

Out of the Block | Wooden Kites w/wo Pegs

Continuing with our Out of the Block Series, we are sharing ways in which our Applique Blocks can be used in non-traditional ways. This month, we took our Kite Applique Block
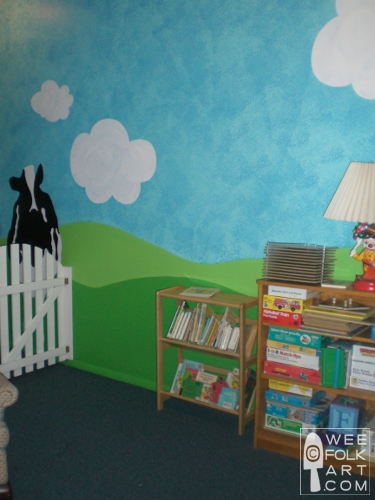
and turned it into a wooden kite with a peg suitable for hanging “stuff” 🙂 Of course, if you just want to use them for decoration, simply leave the peg off, and let a sky full of kites grace your child’s room. (BTW… if you’d like to see how we painted the wall behind the kites, check out the post found HERE.)
To make your own Wooden Kites with Pegs you will need:
3/4″ pine
shaker pegs (optional)
wood paint
cotton roping for tail
woven fabric
Kite Applique Pattern enlarged 200%

Directions:
Enlarge Kite Applique Pattern 200% and make a copy. Using packing tape around edges of the kite pattern, cut out the kite. This will be your template used for tracing the kite on the wood.

Using your pattern template you just created, trace the kites on your wood.


Using a scroll saw, cut out your kite shapes.

Since these are going to be painted, if there are any significant holes, they can be filled with a wood filler and sanded.

Lightly sand the edges. HINT: When sanding straight, smooth surfaces, used a flat piece of sandpaper. When sanding curves, like the edges of the kite, use a flexible sand paper like the sanding sponge pictured here.

Paint the sides and top of the kites. Allow to dry completely.


Dip the end of a thick round paintbrush in paint, and randomly make the dots for the flower centers on the kite top. Redip with each dot.


To make petals around the centers, using the same paintbrush, make 5 dots (petals) around each center. Allow to dry completely.


There are 2 ways you can attach the tail. The first is to simply staple or glue the end of the rope to the backside of the kite.

The other way is to drill a hole in the bottom point of the kite. To do this, get a drill bit that is slightly larger than the rope. Practice on a scrap piece of wood until you are satisfied with the fit.

You can use a hand held drill and drill a hole. WARNING: Be very careful if you do this. It is hard to hold and the drill can slip. Drill a hole about 3/4″ deep.

If you have one, the best and safest way to drill a hole is to use a drill press.


If you are adding a peg to your kite, mark the center, and drill a hole that is a smidgen bigger than the part of the peg that goes into the wood. We used a drill press but you can use a hand held drill. You can go all the way through the kite.


Add some wood or crafting glue to the peg and push down into the hole. Wipe away any extra glue with a wet rag.


For the tail, cut your rope about 13″ long. On one end, wrap a piece of tape tightly around the end, then cut off so about 1/4″ of tape is on the end. This will make it easier to push into the hole.


Add a dab of glue to the hole and insert the taped end of the rope into the hole.


For the ties, rip and tear strips of fabric 1 1/4″ wide. (For tips on how to rip and tear, see the post HERE.)

Cut each piece 5″ – 6″ long. Tie them to the rope every 1 1/2″. Try to tie them so the right side is showing. I put 5 ties on each rope.


To prevent the ties from slipping or the rope end from unraveling, simply put a dot of glue where a tie touches the rope and at the end of the rope.


Use your favorite way to mount them to the wall. We used Joe’s Sticky Stuff, which is “an aggressive pressure sensitive adhesive double sided tape”. It is suppose to be heavy duty and come off without marring walls. We’ve never used it before, so we shall see 🙂


2 Comments
Camille Jacobs
You wouldn’t consider coming out to Glenwood, IL and painting my little one’s room for me, would you? I love your Ben and Jerry’s thing you have going. It would be so perfect in a nursery or children’s room. I love your kites. My DH does no woodworking, we don’t even have a drill, really! Any chance you’d sell your kites in your shop when it opens?
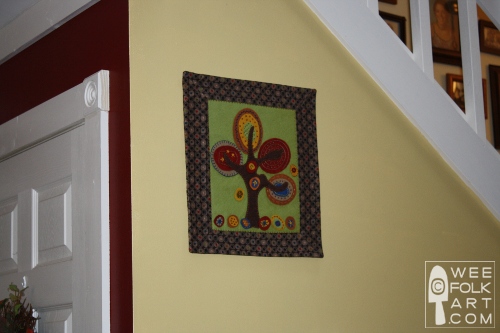
You know, I’ve thought about this before when I’ve been at your site or other ultra crafty mama sites. The children in your life may not realize how special and awesome it is to have parents and grandparents that are so gifted and crafty. I’ve made a few things from your site but there are many things I would never tackle. As an outsider it seems to me an idea pops into your head and Poof, you do it, hehe. Your children are very, very luck! I wish I had surrounded with the creativity that they are. Well, now that I’ve said that, I feel so much better, LOL.
Kimara
First off, I know I was very lucky to be surrounded by creative people. And you are right, my children and Michelle's do think that anything and everything can be made. They do assume it. But don't sell yourself short. You are a creative person, too, I know because you hang out at crafting blogs 🙂 and you are bringing that into your children's lives. And creativity isn't always about crafting things yourself, sometimes it is all about bringing things together.
Since for children, and often for adults too, crafting is more about the process than the product, be brave and just try things, yourself and with your children. Some of the most beautiful projects I've ever seen have been created by people without training or developed talents. There is something beautiful in the raw, honest self expression that a novice brings to a project. Uneven stitching, painting outside the lines, and dolls with lopsided grins can be ever bit as enchanting as something that is perfectly crafted and polish, even more so. And in the eyes of a child, every bit as beautiful!
As far as coming to paint your house… LOL… you are about 30 years too late in asking me. I use to live in Homewood, IL. That would have been doable 😉 But it you like the look of the room, give it a go. It's just paint. If you really, really don't like the way it looks, you can paint over it, but what I did is very forgiving of mistakes and does not need to be perfect to look spectacular!