
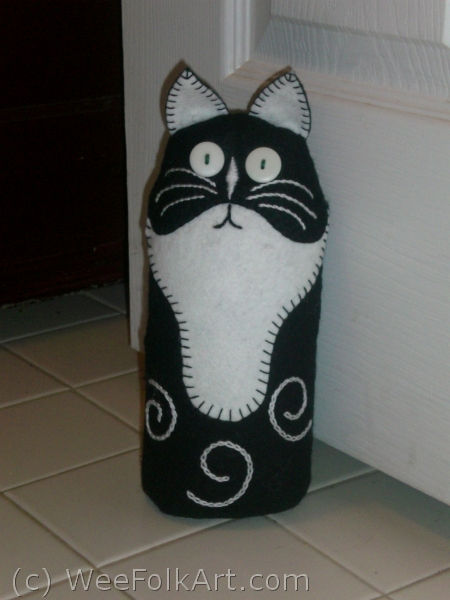
Cat Doorstop

Materials:
Felt color A
Felt color B
Embroidery floss color A
Embroidery floss color B
2 3/4” buttons with 2 holes for eyes
Contrasting embroidery floss for sewing on eyes
Stuffing (wool or polyfil)
Beans, fish gravel or large grained sand for weighting the bottom
Pattern
Directions: (All seams are 1/4″.)
1] Download pattern and make copies.

2] Cut out pattern pieces as follows:
Color A (black)
2 body pieces (front and back)
1 face
2 ear pieces
1 tail
Color B (white)
1 chest
2 ear pieces
1 tail tip
3] Using the pattern as a guide, pin chest in place. Using 3 strands of color A (black), blanket stitch chest to body front. (You do not need to blanket stitch across the top of the chest since it will be hidden under the cat’s face.)

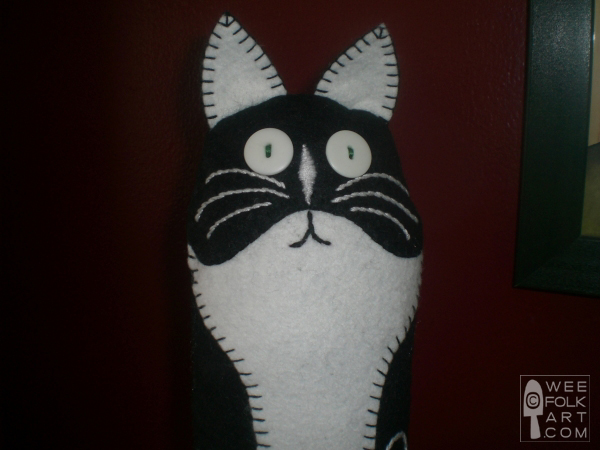
4] Using the pattern as a guide, pin face over the chest and body front. Using 3 strands of color A (black), blanket stitch the lower curved part of the face to body front. Using 3 strands of color A (black), secure face to top of head using a running stitch. (The running stitch should be in the seam allowance so it will not be seen when the cat is shown together. This stitch is only used to hold the face in place.)

5] Transfer nose and whiskers to cat’s face. Using 6 strands of color B (white), stem stitch the 6 whiskers. Using 6 strands of color B (white), satin stitch the nose. Transfer mouth to cat’s chest. Using 6 strands of color A (black), stem stitch the mouth.

6] Using the pattern as a guide, sew on buttons, using 6 strands of a contrasting embroidery floss color (green). (See #5 pic)
7] Transfer the 3 swirls to the cat’s front. Using 6 strands of color B (white), chain stitch the swirl design.

8] Using 3 strands of color A (black), blanket stitch one color A ear to one color B ear. Do the same for other ear. (Sorry…missed a picture of this step. See pics of completed cat.)
9] Using the pattern as a guide, position the ears with color B (white) against the cat’s face. The ears should line up with the top of the head and will cover the eyes. Pin or baste in place.

10] Place the tail tip on the tip of the cat’s tail. Using 3 strands of color B (white) secure the tail tip to the tip of the cat’s tail using a running stitch. Only sew along the jagged pieces of the tail tip. The round edge will be secured to the tail in the next step.

11] Using the pattern as a guide, position the tail to the cat’s back. Pin in place. Using 3 strands of color B (white), blanket stitch the tail to the cat’s back. DO NOT stitch the bottom edge of the tail to the back.

12] With right sides together, stitch front to back leaving a 2 1/2” opening as indicated on the pattern. (This opening will be used to turn cat right side out after the bottom has been added.) Make sure to reinforce the edges of the opening so it does not unravel during the turning process. (This step can be done be by hand or with a sewing machine. If sewing by hand make sure to use very small stitches.)

13] With right sides together, pin bottom in place matching side seams and notches. Sew in place.


Note about patterns: We are sharing patterns we have designed and made for our own children, families and friends. Every effort is made to share information in a clear and accurate manner. We offer preemptive apologies for any mistakes that may be made. Please let us know via comments or emails if you stumble upon a mistake or if you encounter directions that leave your scratching your head! We will rectify the situation as soon as humanly possible!
Copyright © Wee Folk Art 2008-2009. All rights reserved. All photos, text and patterns are copyright protected. You may not copy, reproduce or redistribute any material found on WeeFolkArt.com without written permission. KM Projects retains all rights. All projects, patterns and directions are meant for your personal use and neither the patterns nor completed projects may be used for personal gain.

20 Comments
ferret
This is awesome! ^^
Thank you!
Jill
This is beautiful, I love it! I’m adding this to my summer crafting list.
Trish
We too hand-make cat doorstops in a range of stylish furnishing fabrics – http://www.eastbourneart.com.au/shop/cat-doorstop/
Our range also features pyramid, chook & goose shaped doorstops.
tatiweb
I try to write english, but i’m italian. So I’m sorry if I make some mistake.
Thank you for this pattern.
I love it.
I’ve made this cat for my son.
Here you can see mine
http://www.panzeri.net/tati/Feltro/Feltro.html
bye
Cris
Guest
One query – the paper pattern shows a row of blanket stitch under the cat’s mouth but this does not appear in the photos. How is the black face attached to the white chest? Perhaps black blanket stitch?
I’m making this as a Christmas present so I should be very grateful to hear from you!
Chudleigh
Kimara
I'm not sure I understand what you are asking. On the pdf, you will see the stitches I used. On the pattern piece of the chest, you will see that there is an overlap line. Then in the tutorial, steps 3 and 4, you are instructed to blanket stitch the chest to the cat first, then place the black face over the chest and blanket stitch the face to the chest, and use a running stitch around the top of the head. I realize it is almost impossible to see the stitching in the photos! Black on black does not photo well! I hope if you reread the instructions and look over the pattern again it will make sense. I really don't know how to explain it differently 🙁 Good luck, I hope you can get it figured out! (These are the times I wished I lived close enough to all of our readers so you could sit down next to me and I could help you 🙂
Barb Bowen
I just love this cat door stop. I make my sister a cat door stop every year and this year I used your pattern..Mine was somewhat different from yours but still your pattern. I just love it..and she loved it too. Thanks so much for sharing all you do with us and your life with the world. We really appreciate it so much. Big hugs. Barbara
Kathryn Burger
After pondering the thought – I finally finished my doorstop 🙁
I admit I’m rusty at my hand sewing & I need to move one of the eyes but every time I look at this little guy, it brings a smile to my face.
I made it for my sister as a Christmas gift – I can’t wait to give it to her. The next 5 months will be a long wait but I know she will love it.
Kathryn Burger
PS: wish I could post a photo
Ria Smits
I love cats and I came acrosse your doorstopper, thank you very much for sharing I’m going to make one in the colours of a sweet friend’s cat ,she just moved and need a doorstopper.From the Netherlands greatings to you.Ria
Kimara
Would love to see a photo when you are done. Just include it in our comments. Have fun 🙂
anne-marie nixey
thank you!
Kimara
Thank you so much. He’s been keeping me company for many years and won our “most loved doorstop” a while back. Hope you enjoy him, too 🙂 ~Kimara~
Natasha
Thank you for this wonderful tutorial. I have made an orange and white version for some friends as a Christmas gift. I craft a lot but have only just started sewing projects so im quite proud of him. Id attach a picture but i cant see an option to do so.
Your blog is full of lots of things that have gone on my ‘to make’ list. Lots of lovely ideas. Thank you!
Anouk
Hello,
I need a patern for a friend of mine. She want to make a catdoorstop like this but she can’t find a patern for it.
Is it possible to get it from you?
Regards
Anouk
Kimara
I did link to the pattern in the tutorial above but I understand you might have missed it. You can get the actual pattern by clicking HERE.
Hope she has fun making it 🙂
Pingback:
Janet
Oh so cute and I have subscribed thank you for sharing
Jan
Kimara
Hi Jan,
So glad you like him. He’s a favorite around here! And welcome to our little corner on the net. We hope you stop by often! (hugs)
Kimara
Janet
Hi there Wee Folk Art I have subscribed too your Great website and have tried to download Cat Doorstop 3 times but I cant seem too get it at all I know that my Cookies and internet files are all up to-date so is it possible too some how e/mail this pattern too me please. Many thanks for reading my message.
Jan
Kimara
Sorry you are having a problem. I’ll send your request on to Michelle to see if she can help you 🙂
~Kimara~