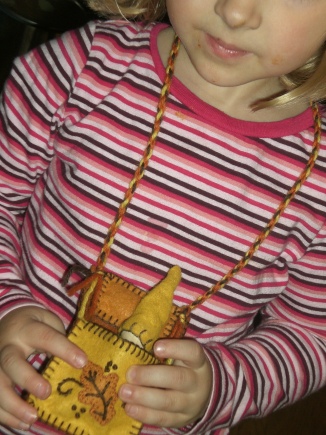
Traveling Gnome Pouch Pattern for Gnomes on the go!
Simple Directions for the Traveling Gnome Pouch Pattern:
Begin by making a Waldorf Peg Gnome Sleeping Bag.
Choose several colors of yarn in colors that match your peg gnome sleeping bag felt colors.
Create a long braid, i-cord (follow our i-cord tutorial), or star braid (follow our star braid tutorial) that that is approximately 24 inches long or double whatever length you would like your pouch to hang down to on your child’s chest.
Tie off both ends of the braid or cord.
Use 6 strands of matching embroidery floss to attach each end of the braid to the top two corners of the gnome sleeping bag. We just tacked ours on the front side.
You Waldorf Peg Gnomes are now ready to go for a ride in their Travel Gnome Pouch.
Please note that Traveling Gnome Pouch Pattern is not intended for children 3 and under. It should only be used by older children and under the supervision of an adult so that it does not pose a strangulation hazard.