Paper Bird Ornaments
With just a stack of rainbow origami paper, card stock paper, and glue, you can create a flock of beautiful paper bird ornaments!

Whether you make one of these sweet paper bird ornaments… hmmm… I mean “tweet” paper bird ornaments… or a whole flock, I am sure they will capture your heart. Of course, making them is a lot like trying to eat 1 potato chip. No matter how strong your resolve is at the beginning of the project, I’m sure you’ll find you won’t be able to stop at just 1! Make sure to stop by next week when I share a project I will be making with my collection of paper bird ornaments!
Materials and Supplies for Paper Bird Ornaments:
- bird pattern
- card stock paper
- heavy duty packing tape
- 6″ square origami paper – to get my colors I used paper from Caydo 50 Vivid Colors and Origami Paper Special
- glue stick
- black permanent mark
- large embroidery needle
- floss or invisible thread for handing
Directions for Paper Bird Ornaments:
Make a copy of the bird pattern on card stock paper.
Make templates of the finished image, wing, beak and body by covering the pattern pieces and the finished image with packing tape. Cut them out. Note: You will be tracing around these templates many times. Printing on card stock and covering with packing tape will help protect the edges when you trace them. Using the yarn needle, make a hole in the eye and the hanging hole of the finished image.

Decide on the colors you want to make your birds. For each bird I used 3 shades of 1 color. Ultimately, I plan to make a rainbow mobile or garland with the birds so I made 3 birds each of purple, blue, green, yellow, orange and red. 18 birds in all.

The following directions are for making 3 birds using light, medium and dark blue origami paper.
Cut 3 pieces of card stock 3″ x 6″. (You can get 3 pieces from 1 piece of card stock.)
Fold your light, medium and dark blue origami paper in half. Place 1 piece of the 3″ x 6″ piece of card stock between the front and back in the fold. On each half sheet of origam paper trace 1 body, 1 beak and 2 wings.

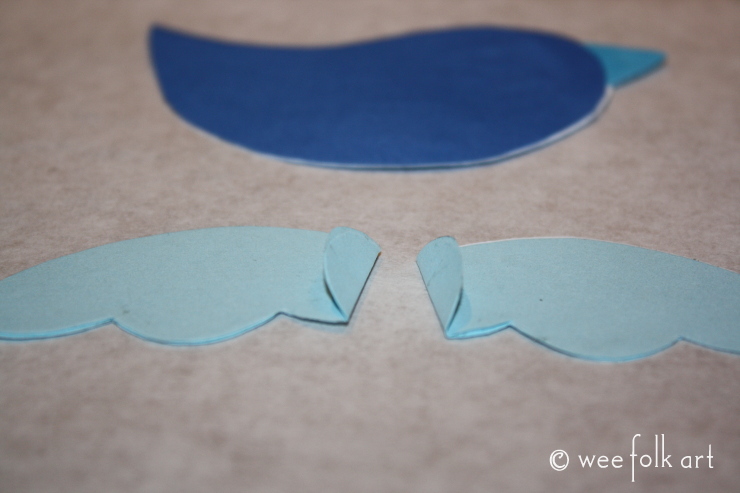
Holding the 3 pieces of paper together, cut out pieces. Keep the individual wings separate since later you’ll want to glue the pieces that were cut out together.

Note on the wings: The origami wing pieces should be cut out as full pieces, however, on the card stock wings you will want to cut off the ends along the line. This will made it easier to fold the wings when gluing them onto the body.

Using a glue stick, glue an origami body piece to the back of the bird. Now, looking at the finished image, glue the beak to the front of the bird. If you slide the finished image template under the body, you can use that as a guide for gluing on the beak.


Glue the front origami piece to the body. Glue the 2 sets of wings together, sandwiching the trimmed card stock wings between the pieces. Fold in the wings at the point where the card stock had been cut away. You have just created the flap that will be used to glue the wings to the body.
Again, using the finish image template for positioning, glue on wings. To do this place glue ONLY on the small flap.

To double check that you placed the wings properly, hold the bird up and look down at the wings. The wings should be in the same position.

Using your large embroidery needle, make holes in the finished image template through the eye and the stringing hole. Set the finished image template over the bird. On one side of the bird, place a pencil through the 2 holes and mark the eye and stringing hole. Turn the bird over and mark the eye on the other side.

Using a fine tipped permanent marker, draw small circles for the eyes.

Using the large embroidery needle, make a hole in the bird for stringing it.

Finally, using invisible thread or floss, add a hanger!

A rainbow of sweet paper bird ornaments!