
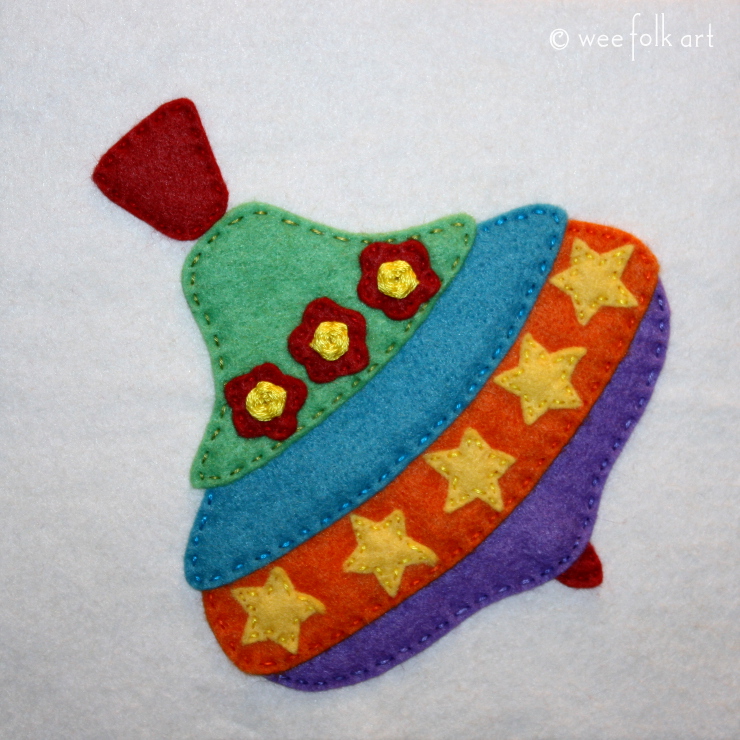
Santa’s Workshop Spinning Top Applique
With Christmas, dare I say it, just around the corner, we are very excited to be sharing some of the projects that we are making for our houses. Michelle has long had a wee handmade ornaments rainbow tree. Year by year she has added to her collection and it looks like this year she will be trading in her little tree for a standard sized tree big enough to hold her growing assortment of ornaments.
Because I want to join in the fun, I have designed a new collection of appliques, which I loving refer to as Santa’s Workshop Appliques. Included in the collection are 4 retro toys including a spinning top, a teddy bear, a toy train and a rag doll. There isn’t an electronic gizmo in site! From this applique collection not only will we share the free appliques and free coloring pages, but the appliques were designed to turn them into retro Christmas ornaments, loaded with sequins and glitz! Over the next 4 weeks I will be sharing the appliques, coloring pages and ornaments. I love them and hope you will, too.
Today we are sharing our Santa’s Workshop Spinning Top Applique. As always it was designed to fit on a 6″ x 6″ block but it can be enlarged or reduced to meet your needs. Enjoy!
The Pattern for the Santa’s Workshop Spinning Top Applique can be found HERE.
The Santa’s Workshop Applique Collection can be found HERE.
The tutorial on How to Enlarge and Reduce Patterns can be found HERE.
The Stitching Glossary can be found HERE.
Our Gallery of all our Appliques can be found HERE.
The tutorial on How to Cut Out Felt can be found HERE.
DIRECTIONS – Refer to pattern and photo for applique placements and cutting instructions.
Make a copy of the pattern.
Cut out felt using the photo and pattern. Transfer any embroidery markings.
NOTE: I usually add one applique piece at a time and sew it directly to the block, but for the spinning top, I basted the 4 main sections of the spinning top together first and them positioned them on the block.
Position the basted spinning top on the block. Using a running stitch and 2 strands of color coordinated floss, sew the spinning top to the block. NOTE: Before sewing the 4th section of the spinning top to the block, position the point behind the 4th section and using 2 strands of floss and a running stitch, sew in place. Then stitch the last section down.
Using a running stitch and 2 strands of floss, sew the flowers and stars to the top. Refer to pattern and photo for placement.
Using 6 strands of floss, add a spider wheel to the center of each flower.

4 Comments
Sonya Main
Is it possible to show a photo of the mini tree with ornaments please. I am slowly swapping conventional decorations for handmade ones on a mini tree but have run out of ideas. I seem to be stuck with trees, bells and stars at the moment. Just about to embark on small snowman but ideas welcome. I have made several gingerbread houses for the tree as presents this year but cannot scale that down. I absolutely love your appliques and have made lots and lots of cushions plain white with four appliques on each and everybody comments on them. Thank you for your page it is inspiring.
Michelle ~ Wee Folk Art
Kimara will be sharing patterns for the felt applique ornaments during the next several weeks… so keep checking back.
In the meantime, here is my little yarn tree as it looked a couple years ago. https://weefolkart.com/knitting-stars/
Pingback:
Pingback: