
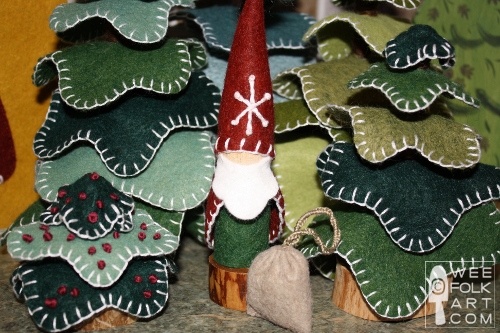
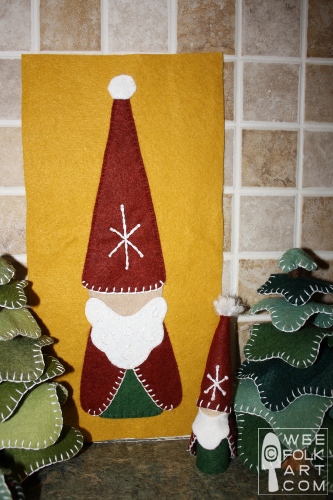
Santa Gnome :: Santa Peg Doll
It’s Christmas and I can guarantee you, little gnomes are waiting for a visit from Santa Gnome. Here’s our version of a Santa Gnome :: Santa Peg Doll to join in the Holiday fun!
Santa Gnome :: Santa Peg Doll Materials:
- Wool felt pieces
- 6 strand embroidery floss or pearl cotton
- “fluff” for pompom (this can be roving, yarn or cotton balls)
- stuffing for sack
- 2 3/8″ x 7/8″ people turnings (wooden pegs)
- Craft glue
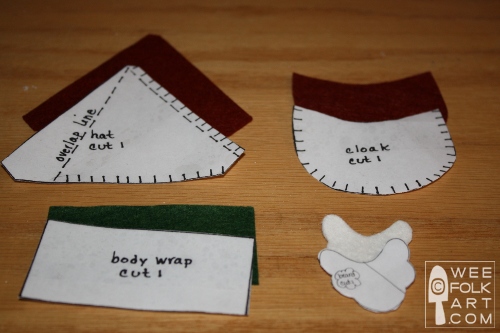
- Pattern for Adult Gnomes https://weefolkart.com/wp-content/uploads/patterns/santa-peg-gnome-pattern.pdf
- Pattern

NOTE: People turnings (wooden pegs) are not all created equal. Even turnings bought from the same company can be slightly different. I highly suggest you make a copy of the pattern, cut it out of paper, and “try it on” your wooden pegs. Make adjusts to the paper pattern before cutting out your felt.
Santa Gnome :: Santa Peg Doll DIRECTIONS
Santa:
1] Make copy of pattern and cut out felt pieces.
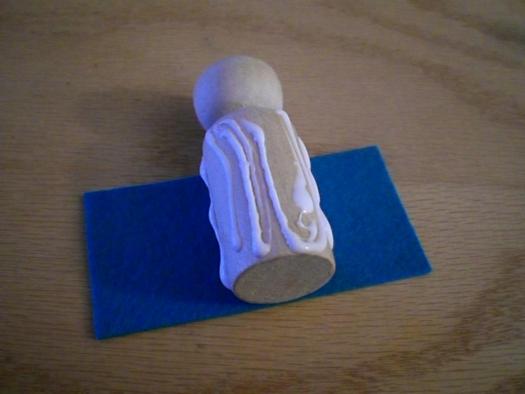
2] Glue body wrap to peg. Match bottom edge of wrapping with bottom edge of peg.
3] Blanket stitch the outer edge of the cloak using 6 strands of embroidery floss.
![]()
4] Wrap cloak around the body so body wrap seam is in the middle of the back under the cloak. Use 6 strands of embroidery and satin stitch closed at neckline.

5] Blanket stitch the lower edge of the hat using 6 strands of embroidery floss. Following the pattern, embroider a snowflake on the hat. Use 6 strands of floss for the stem stitch and 6 strands of floss for the French knots. (see photo in #6)
6] Using the pattern as a guide, overlap hat edges to create cone. Pin together. Cut off the top 1/4″. Unpin the hat and place a small amount of roving, cotton or “fluffy” yarn inside hat so part of it is sticking out of the hat point. Again, overlap the hat edges and pin together. Fluff should be sticking out of the end of the hat. (Don’t worry if it is uneven. You can trim the “pompom” to shape after you sew up the hat. Using 3 strands of matching embroidery floss to sew together. You can either use a blanket stitch or a running stitch.


7] Using pattern as a guide, glue beard to face. To do this run a line of glue along upper edge of beard. Allow the rest of the beard to hang loose.

8] Place a line of crafting glue on the inside of the hat near the edge. Position the hat on the gnome tilting it slightly backward.

Santa Gnome :: Santa Peg Doll Toy Sack Directions:
1] Cut out sack.
2] Slightly overlap the 2 short edges and sew together using 3 strands of floss and a running stitch.


3] Fold the sack so the seam line is in the center back. Using 3 strands of floss, blanket stitch the bottom of the bag.
![]()
4] Using 6 strands of floss, sew around the upper edge of the sack using a running stitch.

5] Stuff the bag with a small amount of stuffing.

6] Draw up the running stitch tight and tie off. Create a loop for the sack’s cord. This can be done in several ways. You can chain stitch a loop, braid 3 pieces of floss together or use a piece of yard or twine. Sew these on to the sack.


3 Comments
Debi M
Many years ago I made some 2″in ceramic Santas. Now that my children are grown I have given them one or two of the many ornaments I made when they were children. Seeing this the Santa Gnome reminded me that I used to make ornaments as gifts for my family. I live on a limited budget. So I think these would make great gifts. Any ideas on how to make an angel or reindeer? I already have them made with the flat and round old fashion clothes pins. Thanks, Debi M
Kimara
Check out this adorable reindeer tutorial: http://www.allcrafts.net/f.php?url=www.cutoutandkeep.net/projects/reindeer
and this sweet angel bear tutorial:
http://craftycollege.com/webofangels/rivert-n.htm
I've played with making animals out of pegs, and I have a few for our wee ones, but I've never perfected a pattern to share… yet 🙂
Pingback: