

Perky Note Holder Directions
Make up this holder to help you get organized when you are out-and-about. Reduce it to 70% and it would make a great holder for standard sized business cards. I’ve included a pdf with my design, but get creative. Creating your own design is great fun!
Hint: When placing appliques on the background, make sure they do not end near the fold line. You can overlap the fold line, but if the applique ends too close to the fold, the edges will be exposed to excessive wear and tear.
Materials:
2 pieces 6” x 7 1/2” felt for front and back, color A (blue)
2 pieces 2 1/2 x 6” felt for pockets, color B (tan)
Scrap felt colors B (tan) and C (white) for appliqués
Embroidery floss in matching colors
4” of 1/4″ elastic or standard elastic ponytail band
1 button approximately 3/4”
PDF Pattern
Directions:
[1] Make copy of pattern. Cut out fabric for front, back, and pockets. (See materials for dimensions.)
[2] Using 6 strands of embroidery floss (that match color A), blanket stitch along one long side of both pockets.
![]()
![]()
[3] Using 2 strands of embroidery floss (that match color A), blanket stitch color B ovals on using the design on the pattern or your own design.

[4] Using 2 strands of embroidery floss (that match color B), blanket stitch color C ovals on top of color B ovals or use your own design.

[5] Using 6 strands of embroidery floss (that match color C) stem stitch swirls using the design on the pattern or your own design.

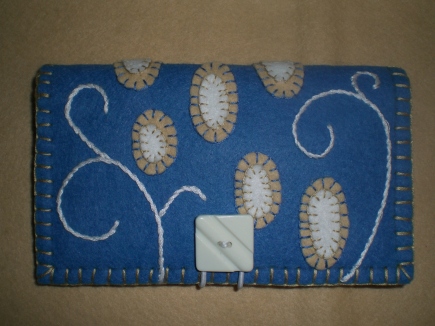
[6] Using 6 strand of embroider floss the color of your button, sew button to the center front so the bottom of the button is 1/4” from the edge. (See photo.)
[7] Sew the elastic or elastic hair band to the inside of the back piece. It should positioned in the center, with a loop overhanging the edge by about 1” with approximately 1/2″ between the pieces of elastic. Securely tack in place.

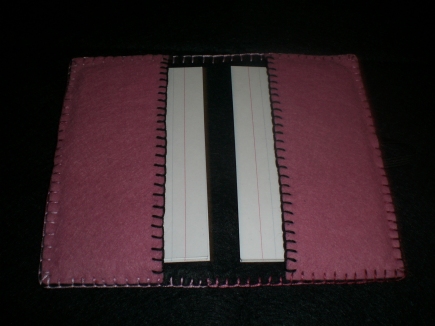
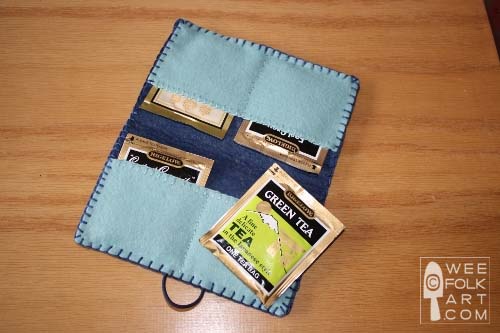
[8] To join the pieces sandwich the front, back and pockets as follows; lay front down so the wrong side is showing, place back on top so the right side is showing, then place one pocket at either end so the finished side is visible. (Photo shows holder after it was blanket stitched together in step 9.)

[9] Pin the three layers together. Using 6 strands of embroidery floss (that match color B), blanket stitch around the four sides. The blanket stitch should be about a 1/4″ deep. (See photo above.)
[10] Load up with 3×5 cards and you’re good to go!


Note about patterns: We are sharing patterns we have designed and made for our own children, families and friends. Every effort is made to share information in a clear and accurate manner. We offer preemptive apologies for any mistakes that may be made. Please let us know via comments or emails if you stumble upon a mistake or if you encounter directions that leave your scratching your head! We will rectify the situation as soon as humanly possible!
www.WeeFolkArt.com
Copyright@Wee Folk Art 2008. All rights reserved.
One Comment
Pingback: